



In a cardiac arrest emergency, every second counts, and incorrect hand placement can reduce blood flow to the brain and vital organs or cause unnecessary injury. Many people learn the general idea of chest compressions but never learn exactly where to place their hands, which leads to hesitation at the exact moment confidence matters most.
The correct hand placement for CPR is the center of the chest, on the lower half of the sternum, for adults and children. Infants require a different technique using the two-thumb encircling hands method or the heel of one hand, positioned just below the nipple line. Getting this position right, combined with the correct depth and rate, is what allows chest compressions to actually circulate blood effectively.
This blog covers the exact hand position for adults, children, and infants according to 2025 AHA guidelines, why correct placement matters for survival, proper body positioning for effective compressions, and the common mistakes that reduce CPR’s effectiveness.
Why Correct Hand Placement Is Important?
Correct hand placement maximizes cardiac output and blood flow to the brain and vital organs during chest compressions. Positioning your hands on the lower half of the sternum allows compressions to squeeze the heart between the breastbone and spine most effectively, which is what actually moves blood through the body during cardiac arrest. Hand placement is one of several components of high-quality CPR, working alongside compression rate, depth, and full chest recoil to determine how effective a resuscitation effort actually is.
Incorrect placement carries real consequences beyond reduced effectiveness. Hands positioned too high can strike the upper sternum without generating adequate cardiac output, while hands placed too low risk pressing on the xiphoid process and injuring the liver, spleen, or stomach. According to the American Heart Association, high-quality CPR with correct technique can double or triple a victim’s chance of survival compared to no CPR at all, which makes hand position far more than a minor technical detail. Rib fractures can occur even with correct placement due to the force required for effective compressions, and understanding when CPR causes broken ribs helps rescuers recognize that this risk should never delay or soften compressions during a real emergency.
Correct Hand Placement for Adult CPR (Puberty and Beyond)
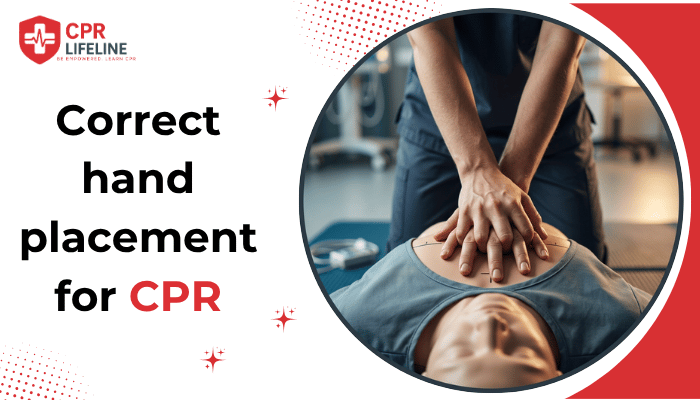
For adults and adolescents who have reached puberty, position the heel of one hand on the lower half of the breastbone, directly in the middle of the chest. Place your second hand on top of the first, interlacing or interlocking your fingers to keep them off the chest wall. Position your shoulders directly over your hands with your arms straight and your elbows locked, then push hard and fast to a depth of at least 2 inches (5 cm) at a rate of 100 to 120 compressions per minute.
The lower half of the sternum is the optimal position because it sits directly above the heart’s ventricles, allowing compressions to generate the greatest possible cardiac output while minimizing the risk of rib or liver injury. Locking your elbows and keeping your shoulders stacked over your hands lets you use your body weight instead of your arm strength, which helps you maintain consistent depth without tiring as quickly. Full chest recoil between compressions is just as important as the compression itself, since it allows the heart to refill with blood before the next compression. If you are untrained or uncomfortable delivering rescue breaths, hands-only CPR is a proven and effective option for adult sudden cardiac arrest, and correct hand placement matters just as much whether or not breaths are included. Once compressions are underway, follow the BLS algorithm for AED integration and rhythm checks as the device becomes available.
Correct Hand Placement for Child and Infant CPR
Hand placement changes based on a child’s size and age, since smaller chests require different technique to reach the correct depth without causing injury. The core position, the lower half of the sternum, stays consistent with adult CPR for children, while infants require an entirely different approach following the 2025 AHA Pediatric Basic Life Support guidelines.
Children (1 Year to Puberty)
Use one or two hands on the lower half of the sternum, at the center of the chest, depending on the child’s size and your ability to reach adequate depth. Smaller children often require only one hand to compress effectively, while larger children closer to puberty may need the two-handed adult technique. Compress to a depth of about one-third the anteroposterior diameter of the chest, approximately 2 inches, at a rate of 100 to 120 compressions per minute.
Infants (Younger Than 1 Year, Excluding Newborns)
Use the two-thumb encircling hands technique or the heel of one hand on the center of the chest, just below the nipple line. The 2025 AHA guidelines eliminated the traditional two-finger technique because it frequently fails to achieve adequate compression depth, and proper technique for CPR on a baby now centers on these two methods instead. The two-thumb encircling technique is preferred when a second rescuer is present to deliver ventilations, while the heel-of-one-hand technique works well for a single rescuer or when the infant’s chest cannot be physically encircled. Compress to a depth of about one-third the chest diameter, roughly 1.5 inches, at the same rate of 100 to 120 compressions per minute used for adults and children.
Newborns follow separate neonatal resuscitation protocols that differ from standard infant CPR and fall outside the scope of this guide. Regardless of age group, the compression rate stays the same across adults, children, and infants. Only the technique, hand position, and depth change to match the size of the person receiving CPR.
Proper Body Position and Compression Technique
Effective chest compressions depend on more than hand placement alone. Body position directly affects how much force you can generate and how long you can sustain effective compressions before fatigue sets in. Follow these steps to position yourself correctly:
- Place the person on a firm, flat surface: A soft or cushioned surface absorbs compression force and makes it difficult to reach adequate depth. Move the person to the floor or another firm surface if possible.
- Kneel beside the chest: Position yourself close enough to place your hands correctly without overextending your reach. Staying centered over the chest makes it easier to maintain consistent pressure.
- Place your hands correctly for the person’s age: Use the hand position outlined earlier for adults, children, or infants. Correct placement is the foundation every other step depends on.
- Align your shoulders directly over your hands: Keep your elbows locked and straight throughout each compression. This lets you use your body weight to generate force instead of relying on arm strength alone.
- Compress to the correct depth and rate: Maintain a rate of 100 to 120 compressions per minute at the depth appropriate for the person’s age. Allow full chest recoil between every compression so the heart can refill with blood.
- Deliver rescue breaths if trained: Follow a 30:2 compression-to-breath ratio for single-rescuer CPR, pausing briefly to deliver two breaths after every 30 compressions. If untrained or unwilling, continue with hands-only compressions instead.
- Switch rescuers when possible: Fatigue reduces compression quality quickly, even before it becomes noticeable. Switching rescuers every two minutes when a second person is available helps maintain consistent depth and rate throughout a prolonged resuscitation effort.
Common Mistakes in CPR Hand Placement and How to Avoid Them
Mistakes happen when stress takes over, even for trained rescuers. That is why training should focus not just on technique, but on building the habit of self-checking. A quick adjustment early in the process can keep small errors from dragging down the entire resuscitation.
Hands Placed Too High
Positioning your hands on the upper sternum or near the neck reduces cardiac output because compressions land above the heart’s ventricles. Move your hands down to the center of the chest, directly on the lower half of the sternum, to correct this.
Hands Placed Too Low
Placing your hands too low and compressing over the abdomen or the xiphoid process can injure the liver, spleen, or stomach. The xiphoid is the small cartilage tip at the bottom of the breastbone. Locate the lower half of the sternum specifically, not the area just below it, before beginning compressions.
Fingers Pressing on the Ribs
Interlacing your fingers and lifting them off the chest wall prevents pressure from spreading onto the ribs during compression. Fingers left flat against the ribs increase the risk of rib fracture beyond what correct technique alone produces.
Leaning on the Chest Between Compressions
Failing to let the chest fully rise between compressions prevents the heart from refilling with blood, reducing the volume pumped with each subsequent compression. Lift your body weight completely off the chest after each compression while keeping your hands in contact with the skin.
Arms Bent Instead of Locked Straight
Compressing with bent elbows relies on arm strength instead of body weight, which tires rescuers quickly and often results in inconsistent depth. Keep your elbows locked and your shoulders directly over your hands throughout every compression.
Each of these mistakes reduces blood flow, increases injury risk, or both, but none of them should ever be a reason to hesitate before starting CPR. A quick mental check of hand position, body alignment, and depth takes only a few seconds and can be corrected mid-compression without stopping the resuscitation effort.
Correct Hand Placement Can Make the Difference Between Life and Death
Correct hand placement follows a clear pattern across every age group. Adults and children use two hands or one hand on the lower half of the sternum, at the center of the chest, while infants require the two-thumb encircling technique or the heel of one hand just below the nipple line. Hand placement is only one piece of high-quality CPR, working alongside compression rate, depth, and full chest recoil, but getting it right is what allows every other element of the technique to actually save a life.
Reading through the correct positions builds awareness, but hands-on practice with a certified instructor is what makes the technique automatic when a real emergency demands it. CPR Lifeline offers AHA-certified CPR, BLS, and Hands-Only CPR courses across Tennessee and Georgia for individuals, families, and workplace teams. Browse available CPR certification classes and build the muscle memory that puts correct hand placement within reach the moment it counts.
Faqs

Chris Peters
Chris Peters is a certified American Heart Association instructor and firefighter since 1996 with over 30 years of emergency response experience. After answering thousands of 911 calls, he founded CPR Lifeline to provide AHA-certified training that transforms bystanders into confident lifesavers who act decisively when seconds count