


Among pediatric out-of-hospital cardiac arrests in the U.S., infants have the lowest survival rate of any pediatric age group. That gap exists partly because things move so fast with a baby, and because a rescuer’s brain can go blank fast in the moment, making it hard to think clearly about what to do next. This is exactly why it helps to know the steps of Cardiopulmonary Resuscitation (CPR) ahead of time. Knowing how to do CPR on a baby, even the basics, can help you stay calm and act fast in those first critical minutes before help arrives.
CPR on a baby starts with checking whether they are responsive and breathing normally, then calling 911 right away, either yourself or through someone nearby. From there, you give repeated cycles of chest compressions, pushing down about 1.5 inches, paired with small rescue breaths suited for a baby’s smaller size. You continue this cycle until the baby starts breathing on their own or emergency responders take over.
This guide walks you through every part of baby CPR in detail, covering positioning, compressions, rescue breaths, and how the process changes depending on whether you are alone or have someone helping you, so you understand not just what to do but why each step matters.
When Should You Perform CPR on a Baby?
Certain signs make it clear that a baby needs CPR right away, and recognizing them quickly matters. You should begin CPR if a baby shows any of the following:
- Unresponsive to touch or sound
- Not breathing at all
- Only gasping, which can look like breathing but is actually a sign the body is in serious distress
This can happen for a number of reasons, including:
- Choking on food, a small object, or liquid
- Drowning or near drowning, even in shallow water
- Suffocation, including accidental smothering during sleep
- Sudden infant death syndrome (SIDS) related events
- Severe allergic reactions
- Infections that affect breathing
If the baby does not respond to gentle stimulation and is not breathing normally, begin CPR right away, following the CAB sequence and call 911. It is always safer to start CPR on a baby who did not strictly need it than to hesitate on one who did.
What to Do Before You Start Infant CPR
A baby’s safety in the first moments depends on a few quick checks. These do not take long, but skipping them can waste time or put you both at risk.
Follow these quick steps before jumping into compressions:
- Check the area around the baby to make sure it is safe for both of you. Move the baby only if they are in immediate danger, such as near water or fire.
- Check for a response. Gently tap the baby’s foot and call their name loudly. Do not shake a baby, even to try to wake them up, since this can cause injury.
- Call 911. If someone else is nearby, have them call 911 immediately while you begin CPR. If you are completely alone, give about 2 minutes of CPR first, then call 911 yourself.
- Check breathing. Look at the baby’s chest for about 10 seconds. Watch for it rising and falling in a normal rhythm. If there is no breathing, or it is just occasional gasping, start CPR immediately.
- Note the time, if you can, or ask someone nearby to. Emergency responders will often ask how long the baby has been unresponsive, and this helps guide their care.
How to Perform CPR on a Baby Step by Step
Once you have confirmed the baby is unresponsive and not breathing normally, and someone is calling 911 or you have made the call yourself, it is time to begin CPR. You should follow these steps in order, and try not to rush because a steady, correct technique matters more than speed.
Here is the step-by-step process recommended by the American Heart Association (AHA) to perform CPR on an infant, adapted from the general 7 steps of CPR that apply across all age groups:
Step 1: Position the baby
Lay them face up on a firm, flat surface, like a table, the floor or the ground. Never perform CPR on a bed, couch or while holding the baby in your arms, since a soft surface absorbs the pressure that is supposed to reach the heart.
Step 2: Find the compression spot
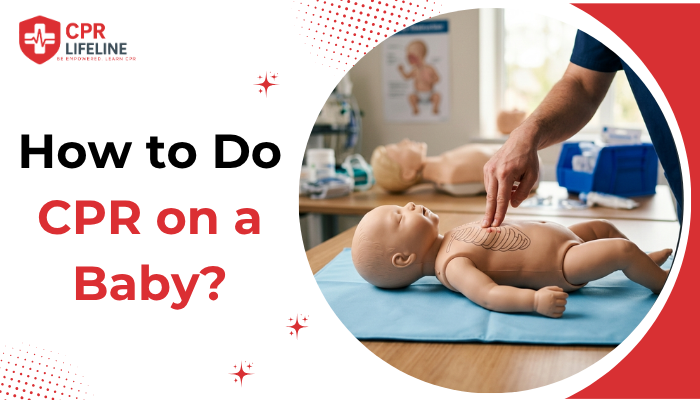
Locate the center of the baby’s chest, just below an imaginary line connecting the nipples. This is the correct spot for both compressions and breath checks.
Step 3: Place your hands correctly
If only one rescuer is present, you are responsible for both compressions and breaths. Place the heel of one hand on the center of the infant’s chest, just below the nipple line. Your other hand stays free so you can use it to help hold the head tilt steady once you get to the breathing step. This technique lets you switch quickly between compressions and breaths by yourself.
If two trained rescuers are present, use the two thumb encircling technique. One rescuer places both thumbs side by side on the center of the chest, just below the nipple line, while wrapping their fingers around the infant’s chest to support the back. The second rescuer stays at the baby’s head and is responsible for opening the airway and giving the rescue breaths.
Step 4: Give chest compressions
Once your hand is in position, begin compressing at a steady, consistent pace, somewhere between 100 and 120 compressions per minute. Push straight down about 1.5 inches, roughly one third of the chest depth, then let the chest fully rise back up between each push. This is called chest recoil, and it lets blood flow back into the heart before the next compression.
If you are the only rescuer, give 30 compressions before moving to breaths. If a second trained rescuer is helping, give 15 compressions instead.
Step 5: Open the airway
After chest compressions, tilt the baby’s head back just slightly and lift the chin with two fingers. Keep the tilt minimal because tilting too far back can actually close off a baby’s airway instead of opening it, which is different from adult CPR where a deeper tilt is needed.
Step 6: Give rescue breaths
Cover the baby’s mouth and nose completely with your mouth to create a full seal, then give one gentle breath, about 1 second long, just enough to see the chest rise slightly. Give a second breath the same way. Avoid blowing hard or fast, since a baby’s lungs are small and forceful breaths can cause air to enter the stomach instead of the lungs.
Step 7: Repeat the cycle
Continue alternating compressions and breaths in the correct ratio until one of the following happens:
- The baby starts breathing on their own or shows clear signs of movement
- Emergency responders arrive and take over
- An AED becomes available and is ready to use
- You become too physically exhausted to continue safely
If more than one rescuer is present, switch roles every two minutes to prevent fatigue. Keep the pause in compressions as brief as possible during the swap. Fatigue causes compression quality to drop quickly, even if you do not feel tired yet.
Why Infant CPR Is Different from Adult CPR
Infant CPR is a version of cardiopulmonary resuscitation designed specifically for babies from birth up to 1 year old. It works the same way adult CPR does, keeping oxygen-rich blood moving to the brain, heart, and other organs until the baby’s own heart and lungs can take over, or until paramedics arrive.
Many people assume CPR is performed the same way regardless of age, but that isn’t true when it comes to babies. Because babies have smaller chests, softer bones, and more delicate airways, you have to adjust hand placement, compression depth, breath size, and head position compared to adult CPR.
The table below breaks down exactly how infant and adult CPR compare, side by side.
| Feature | Infant CPR | Adult CPR |
|---|---|---|
| Hand position | Heel of one hand, or two thumbs with a second rescuer | Both hands, interlocked, heel of hand |
| Breath size | Small, gentle puff | Full breath |
| Head tilt | Slight tilt | Deeper tilt |
| Compression depth | About 1.5 inches | About 2 inches |
| Common cause of arrest | Usually a breathing problem first | Usually a heart problem first |
In adults, cardiac arrest is usually caused by a heart problem first. In babies, it tends to be the opposite: a breathing problem happens first, from choking, an infection, or an airway obstruction, and the heart stops as a result. This is part of why rescue breaths matter so much in infant CPR, even more than the table alone shows.
Common Infant CPR Mistakes to Avoid
Even trained rescuers can slip into habits that compromise high-quality CPR, especially under the stress of a real emergency. Most of these mistakes come from applying adult CPR instincts to a baby’s much smaller body, which can lower blood flow, injure the baby, or slow down recovery.
Here are the infant CPR mistakes you should be aware of:
- Tilting the head too far back: This is one of the most common errors and can close off a baby’s airway instead of opening it. A slight tilt is all that is needed.
- Giving breaths too hard or too fast: A baby’s lungs are tiny, so only a gentle puff is required. Breathing too forcefully can push air into the stomach instead of the lungs, which can cause vomiting.
- Compressing too shallow: Not pushing deep enough means blood is not being pumped effectively to the brain and heart.
- Compressing too slow and pausing too long between pushes: This reduces blood flow and lowers the chances of a successful outcome. If you’re not sure you’re keeping the right pace, playing a song with the right beat can help you stay consistent.
- Not allowing full chest recoil: Leaning on the chest between compressions prevents the heart from refilling with blood properly.
- Performing CPR on a soft surface: Always move to a firm, flat surface first because a mattress or couch cushion absorbs the pressure that is supposed to reach the baby’s heart.
- Waiting too long to call 911: Even a minute of delay can matter, so call as soon as possible, either yourself or through someone nearby.
Acting Fast During Infant CPR Saves Lives
Learning how to give infant CPR is one of the most valuable skills a parent, grandparent, babysitter, or caregiver can have. For infant CPR, what matters most is correct positioning, the right compression depth, small gentle breaths, and following the correct compression-to-breath ratio. Getting these basics right can meaningfully improve a baby’s chances before help arrives, and being willing to act quickly and stay steady under pressure counts for more than a flawless technique.
If you want to build that hands-on confidence, CPR Lifeline offers AHA-certified CPR courses. These courses use a blended learning format, a self-paced online module followed by a short 30-minute in-person skills check on a voice assisted manikin, so you get real-time feedback on your technique. CPR training prepares you to act without hesitation when it actually matters.
Faqs

Chris Peters
Chris Peters is a certified American Heart Association instructor and firefighter since 1996 with over 30 years of emergency response experience. After answering thousands of 911 calls, he founded CPR Lifeline to provide AHA-certified training that transforms bystanders into confident lifesavers who act decisively when seconds count